Administration
Administration Guide
Configure ASYNC at the organization level. Manage AI providers, OAuth integrations, team roles, and storage from a single administration console.
Accessing Administration
ASYNC Administration is available to Jira site administrators only. To access it, navigate to:
Jira Settings → Apps → ASYNC → Administration
The admin console is organized into three tabs: Settings, Integrations, and Storage. All changes within the Settings tab are batched and saved together using the Save changes button. An unsaved changes indicator will appear when modifications are pending.
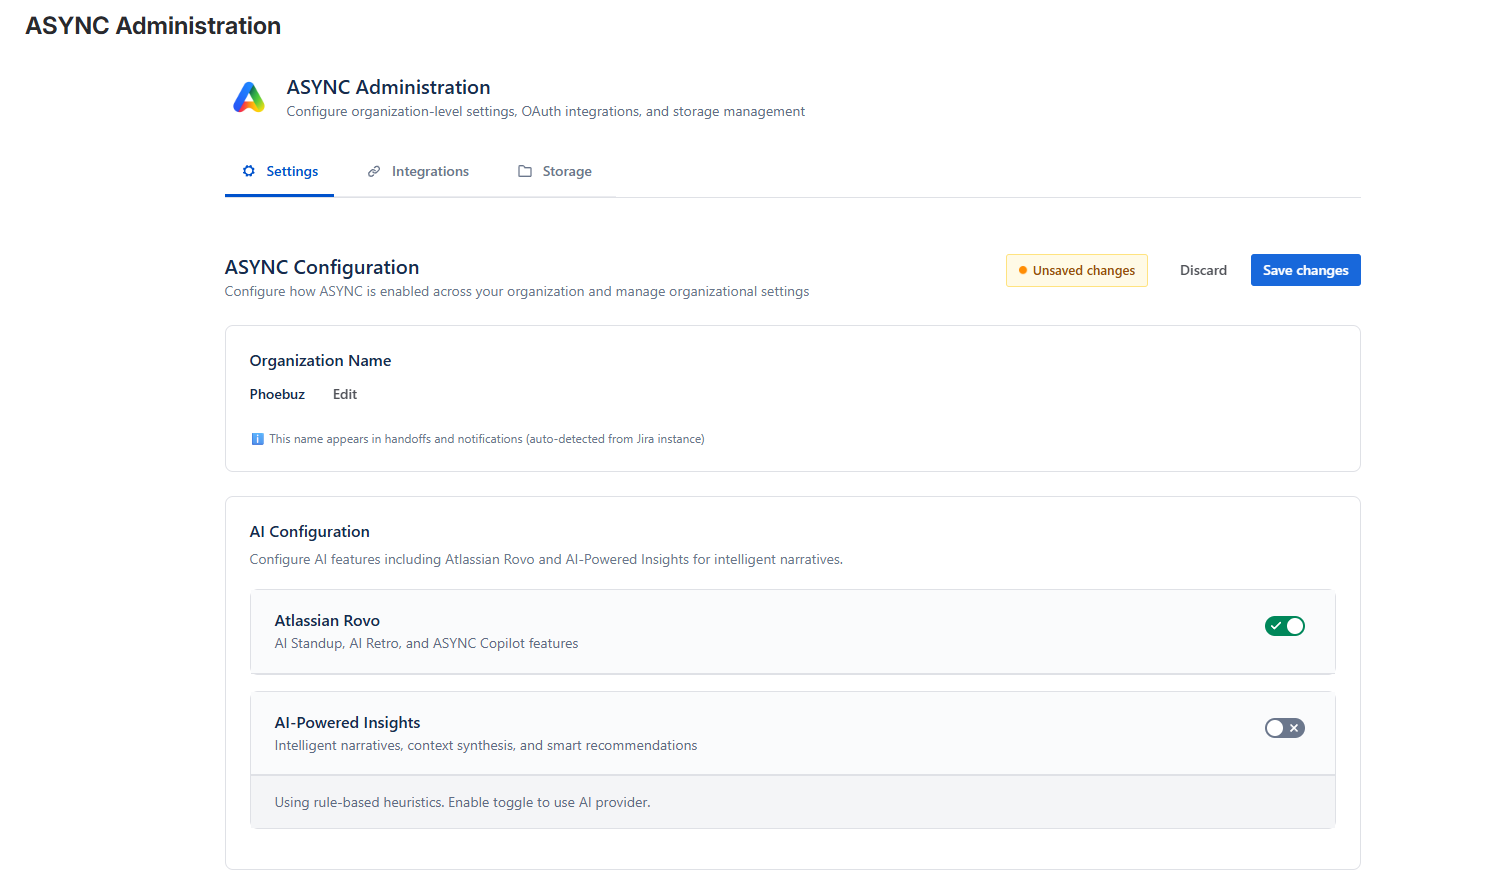
Tip: ASYNC warns you before navigating away with unsaved changes. Use the Discard button to revert all pending changes, or Save changes to persist them.
Organization Name
The organization name is used across ASYNC for handoff notifications, standup summaries, and team identification. ASYNC will attempt to auto-populate this from your Jira site settings on first load.
-
Review the auto-populated name
When you first open Admin Settings, ASYNC automatically detects your organization name from Jira. If the detected name is correct, no action is needed.
-
Edit if needed
Click into the organization name field to modify it. This name appears in handoff emails and standup reports sent to team members.
-
Save your changes
Click Save changes at the top of the Settings tab. The organization name will be updated across all ASYNC features.

AI Configuration
ASYNC's intelligence features are powered by two AI systems that can be configured independently: Atlassian Rovo for the Copilot sidebar experience, and AI-Powered Insights for intelligent narrative generation and synthesis.
Atlassian Rovo
Rovo powers ASYNC's Copilot sidebar, AI Standup generation, and Sprint Retrospective features. Rovo is included with Jira Premium and Enterprise plans.
-
Check Rovo availability
ASYNC automatically detects whether Rovo is active on your Jira site. The status will show as Available (green) or Not Available (yellow).
-
Enable Rovo if not active
If Rovo is not available, navigate to admin.atlassian.com → your organization → Rovo to enable it. Then return to ASYNC and click Recheck Status.
-
Enable AI features toggle
Once Rovo is detected, toggle on Enable AI Features to activate Copilot, Standup, and Retrospective capabilities across your ASYNC instance.
Good to know: When Rovo is unavailable, users will see a modal explaining the requirement when they try to use AI Standup, Retrospective, or Copilot features from the dashboard.
AI-Powered Insights
AI-Powered Insights generates intelligent narratives, sprint analysis, blocker detection, and action recommendations. You can choose from multiple LLM providers or use the built-in Forge LLM.
Supported Providers
| Provider | Recommended Model | API Key Required | Notes |
|---|---|---|---|
| Forge LLM | Default | No | Built-in, zero configuration. Good starting point. |
| Anthropic Claude | Sonnet 4 | Yes | Recommended for best quality narratives. |
| OpenAI | GPT-4o | Yes | Strong general-purpose option. |
| Google Gemini | Flash 2.0 | Yes | Fast and cost-effective. |
-
Enable AI-Powered Insights
Toggle on the AI-Powered Insights master switch. When disabled, ASYNC falls back to heuristic-based analysis (rule-based, no LLM).
-
Select your provider
Choose a provider from the dropdown. Forge LLM requires no additional setup. For Anthropic, OpenAI, or Google, you'll need to provide an API key.
-
Enter your API key
Paste your API key into the secure field. Keys are encrypted at rest using Atlassian Forge storage encryption. Use the show/hide toggle to verify your key, and the Clear button to remove it.
-
Test the connection
Click Test Connection to verify your API key and provider are working. A green Connected badge confirms success. The timestamp of the last successful test is displayed for reference.
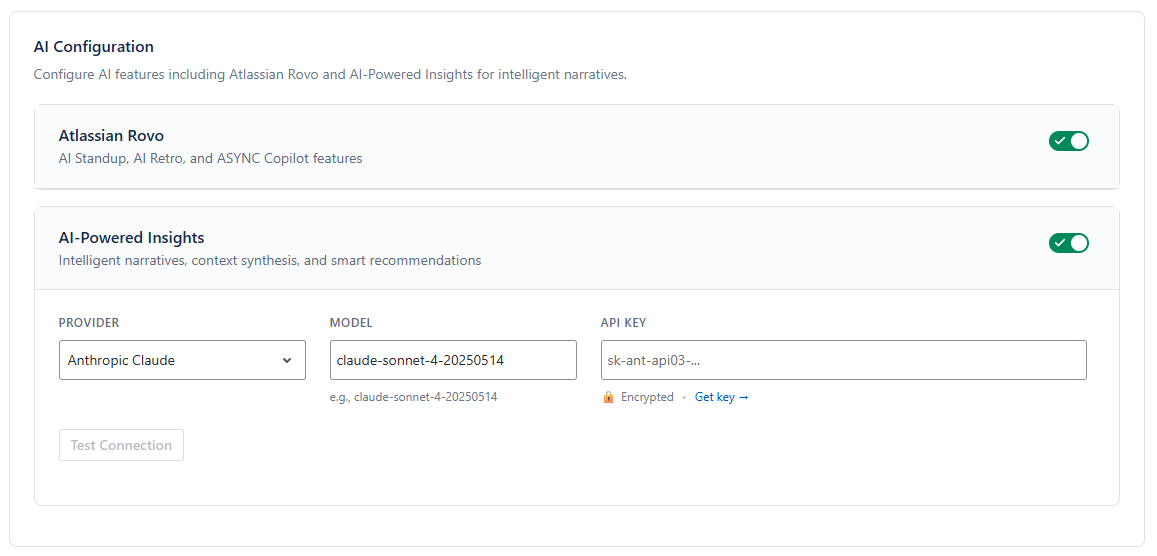
Security note: API keys are encrypted using Atlassian Forge's built-in storage encryption. ASYNC never transmits keys to any third party other than the selected LLM provider for inference requests.
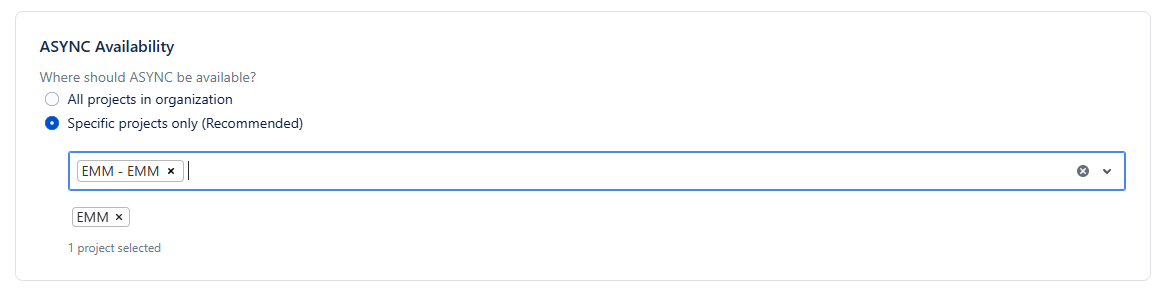
ASYNC Availability
Control which Jira projects have access to ASYNC. This is a site-wide setting that determines project-level availability.
All Projects
ASYNC is enabled for every project on your Jira site. Any project administrator can configure ASYNC in their project settings. This is the simplest option but gives less control over rollout.
Specific Projects (Recommended)
Manually select which projects have access to ASYNC. This is the recommended approach for controlled rollout, allowing you to onboard teams incrementally. Use the multi-select dropdown to search and select projects by name or key.
Projects not in the list will see a "ASYNC not available for this project" message in their project settings, with options to navigate to Admin Settings or copy a request message for their administrator.
Best practice: Start with 1–2 pilot projects to validate your configuration and integration setup before rolling out to the full organization.
Role Management
Define team member roles that are available across all projects. Roles are used when assigning team members in Project Settings and appear in dashboards and intelligence reports.
Common examples include: Developer, QA Engineer, Tech Lead, Product Manager, Designer, DevOps Engineer.
-
Add a role
Type the role name in the input field and click Add. Duplicate names (case-insensitive) are automatically prevented.
-
Remove a role
Click the × on any role tag to remove it. Removing a role does not affect existing team member assignments in project settings — they will retain the role text until re-assigned.
Vendor Management
Define external vendors and partner organizations. When adding team members in Project Settings, each member can optionally be associated with a vendor, enabling ASYNC to distinguish between internal staff and external contributors in reports and intelligence.
Add vendors by typing their name and clicking Add. Remove with the × button on each tag. Duplicates are prevented automatically.
Strategic Pulse Access Control
Strategic Pulse provides cross-team insights, aggregated metrics, and organizational intelligence. Due to the sensitivity of this data, access is restricted to explicitly authorized users.
-
Search for users
Type at least 2 characters to search for users by name or email. ASYNC uses a typeahead pattern with 300ms debounce to find matching Jira users.
-
Add authorized users
Select users from the search results to grant them Strategic Pulse access. Each user is displayed with their avatar, name, and email address.
-
Remove access
Click the remove button next to any user to revoke their Strategic Pulse access. Changes take effect after saving.
Important: If no users are authorized, a warning is displayed. Without any authorized users, no one can access Strategic Pulse data including cross-team aggregated metrics and organizational intelligence cards.
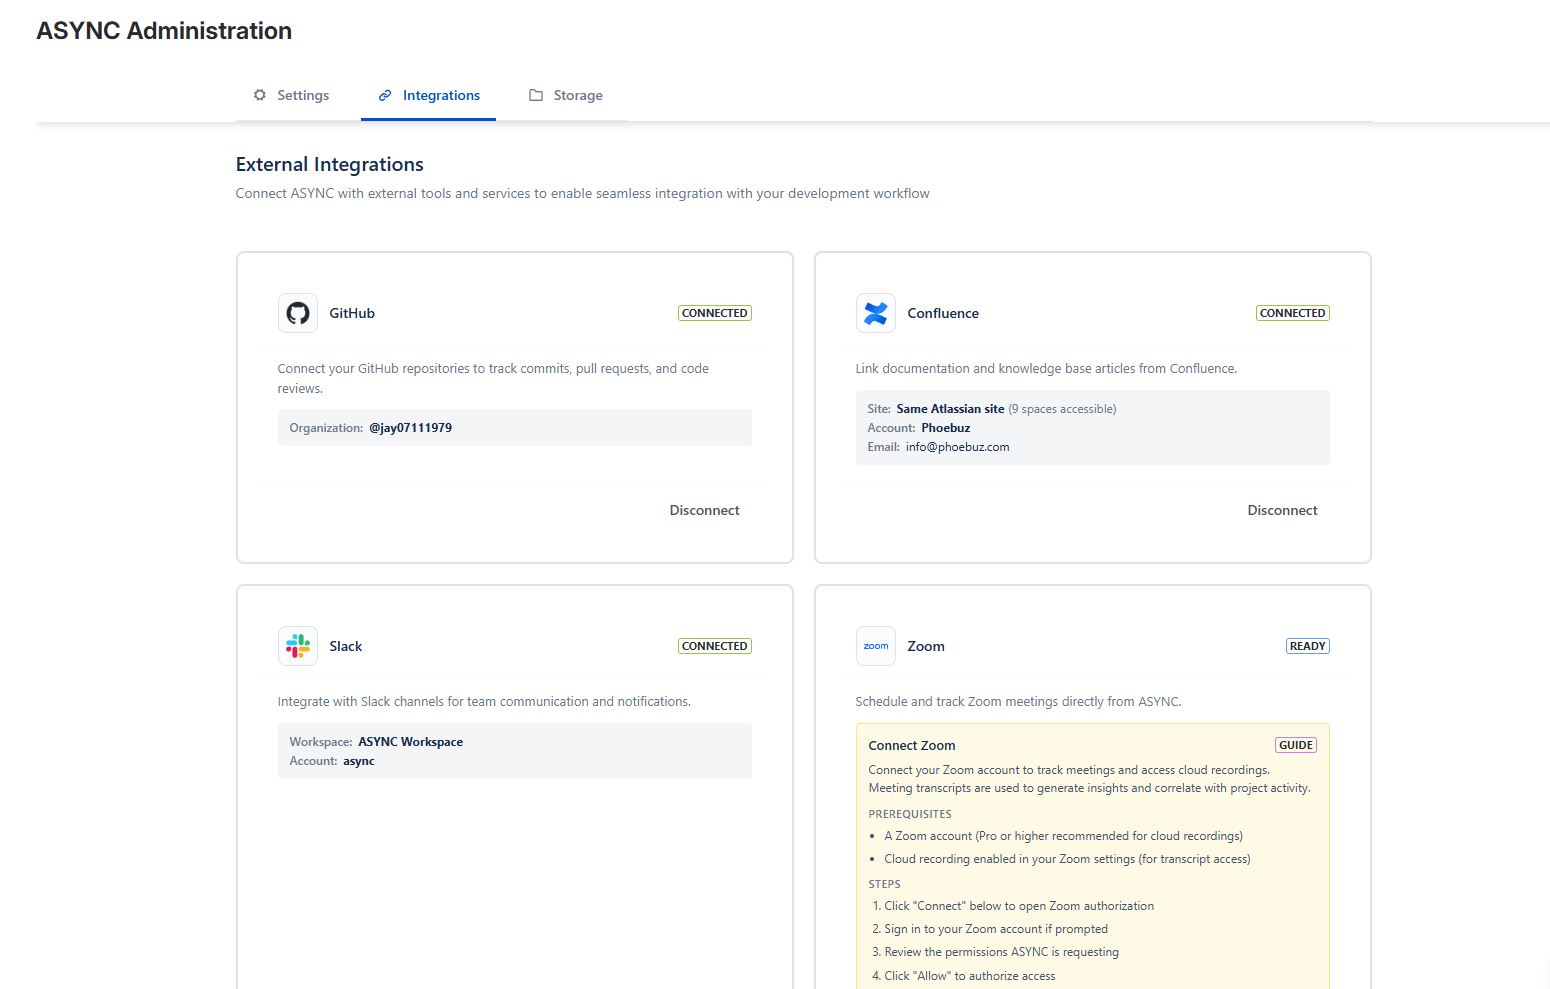
OAuth Integrations
The Integrations tab manages organization-level OAuth connections to external tools. Once connected here, project administrators can enable these integrations at the project level. ASYNC supports integrations across multiple categories, with more providers planned for future releases.
Integration Categories
| Category | Current Provider | Data Ingested | Required | Auth Method |
|---|---|---|---|---|
| Project Management | Jira | Issues, sprints, boards, story points, status transitions | Required | Built-in (Forge) |
| Source Control | GitHub | PRs, commits, reviews, CI pipelines (metadata only) | — | OAuth 2.0 |
| Team Messaging | Slack | Channel messages, threads, mentions (metadata only) | — | OAuth 2.0 |
| Meetings | Zoom | Meeting metadata, duration, participant count | — | OAuth 2.0 |
| Documentation | Confluence | Page activity, documentation freshness | — | Forge (Verify Access) |
Privacy: ASYNC never reads, stores, or processes your source code. Only metadata (PR titles, commit messages, review status, pipeline results) is ingested from source control integrations. The same metadata-only principle applies to all integration categories.
Connecting an Integration
The general flow below applies to all OAuth providers. For provider-specific prerequisites, OAuth scopes, exact connection steps, and disconnect instructions for Jira, Confluence, GitHub, Slack, and Zoom, see the dedicated Integration Setup Guides.
-
Click Connect
On the integration card, click Connect (or Verify Access for Confluence). A new browser tab will open for the OAuth authorization flow.
-
Authorize ASYNC
Follow the prompts in the provider's authorization screen. Grant the requested permissions for ASYNC to read the necessary metadata.
-
Wait for confirmation
ASYNC polls for connection status automatically (every 2 seconds, up to 4 minutes). Once the OAuth flow completes, the integration card will update to show Connected with a green status badge.
Disconnecting an Integration
Click Disconnect on any connected integration. A confirmation modal will appear with:
- Impact information (how many projects use this integration)
- Instructions to revoke access at the provider level (GitHub Settings, Slack App Management, etc.)
- A link to the provider's settings page for token revocation
Zoom free plan limitation: Zoom free plans have restricted API access. ASYNC will display a warning if your Zoom connection has limited capabilities. Meeting transcription data may not be available on free plans.
Storage Management
The Storage tab provides visibility into ASYNC's data footprint across your organization. All data is stored in Atlassian Forge's encrypted storage infrastructure.
Storage Overview
Four key metrics are displayed at the top of the Storage tab:
| Metric | Description |
|---|---|
| Total Storage | Total data consumed by ASYNC across all projects (displayed in KB, MB, or GB). |
| Avg Monthly Consumption | Average storage growth over the last 30 days. |
| Avg Monthly Reads | Read operations as a percentage of Forge's 100 GB free tier allocation. |
| Avg Monthly Writes | Write operations as a percentage of Forge's 100 GB free tier allocation. |
Project Breakdown
A detailed table shows per-project storage data including: project name, total records, estimated size, last sync timestamp, next sync time, sync count (30-day window), active providers, and health status.
Health status is color-coded:
- Healthy — Normal storage levels and sync activity
- Moderate — Approaching recommended limits
- High — Storage or sync frequency may need attention

Reset to Factory Settings
The Reset to Factory Settings button provides two reset scopes for troubleshooting or decommissioning:
Data Only Reset
Removes all synced data (correlations, metrics, intelligence records) while preserving your settings, team configurations, and integration connections. Useful when you want to start fresh with data collection without reconfiguring everything.
Complete Reset
Removes everything — all data, settings, team configurations, and integration tokens. After a complete reset, ASYNC will require full reconfiguration. OAuth tokens should also be revoked at each provider's settings page.
Warning: Factory reset is irreversible. A confirmation dialog shows the exact number of records and estimated data that will be deleted. Both options require explicit confirmation before proceeding.