Configuration
Project Settings
Configure ASYNC at the project level. Enable integrations, set up teams with timezones and working hours, and control how often data syncs.
Accessing Project Settings
ASYNC project settings are available to Jira project administrators. Navigate to:
Project Settings → Apps → ASYNC Settings
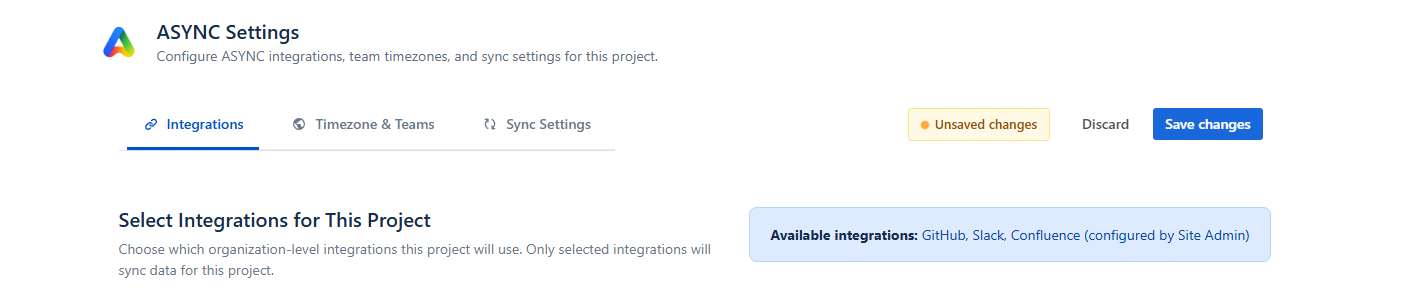
The project configuration is organized into three tabs: Integrations, Timezone & Teams, and Sync Settings. All changes are batched and saved together using the Save changes button. An unsaved changes indicator appears when modifications are pending.
ASYNC not available? If you see "ASYNC not available for this project", your site administrator has not enabled ASYNC for this project. Click Go to ASYNC Administration (if you're a site admin) or use the Copy Message button to send a request to your administrator.
Integrations
The Integrations tab lets you choose which organization-level integrations this project will use. Only integrations that have been connected by a site admin are available here.
Available Integrations
| Category | Current Provider | What It Syncs | Resource Selection |
|---|---|---|---|
| Source Control | GitHub | Pull requests, commits, code reviews, CI pipeline metadata | Select specific repositories to monitor |
| Team Messaging | Slack | Messages, threads, mentions, reactions | Select channels (public, private, or all) |
| Meetings | Zoom | Meeting metadata, participant counts, duration | Configure filter method and meeting criteria |
| Documentation | Confluence | Page activity, documentation freshness, RFCs, ADRs | Select spaces and optionally filter by page type |
Enabling an Integration
-
Toggle the integration on
Find the integration card and flip the enable toggle. The card expands automatically to show resource configuration options. Disabling an integration collapses the card and excludes it from future syncs.
-
Select resources to monitor
Use the resource selector to choose which resources apply to this project (e.g., repositories for source control, channels for messaging, spaces for documentation, or meeting filters). The selector shows the organization connection details for reference.
-
Save changes
Click Save changes at the top of the page. Enabled integrations will begin syncing data on the next scheduled sync.

Slack: Channel Selection
Slack offers additional channel selection options:
- Public channels (default) — ASYNC automatically joins public channels when you select them
- Private channels — Requires you to manually invite ASYNC by typing
/invite @ASYNCin the channel - All channels — Shows both public and private (requires
groups:readOAuth scope)
Each selected channel displays a join status badge: Bot joined (ready), Pending (queued), Invite required (private channel needing manual invite), or Join failed (error).
Best practice: Select channels directly relevant to your project (e.g., #proj-backend, #proj-standup). Public channels provide the richest collaboration data. ASYNC respects Slack's rate limits and privacy settings.
Zoom: Meeting Filters
Zoom integration offers five filter methods to control which meetings are synced:
Team Members (Recommended)
Sync meetings where any project team member participated. This is the recommended method as it automatically captures relevant meetings based on your team configuration, with no manual filter maintenance required.
Topic Patterns
Match meeting titles against regex patterns. ASYNC provides quick-add presets:
- Standups — Matches "standup", "daily", "sync"
- Sprint Ceremonies — Matches "sprint", "planning", "retro", "review"
- Project Meetings — Matches your project key pattern (e.g.,
PROJ-\d+) - Exclude 1:1s — Excludes "1:1", "one-on-one", "1-on-1"
- Exclude All-hands — Excludes "all hands", "town hall"
You can also add custom include/exclude patterns.
Host Emails
Only sync meetings hosted by specific users. Enter email addresses to build the host list.
Combined
Uses topic patterns and requires team member participation. The strictest filter option — a meeting must match a topic pattern and include at least one team member.
All Meetings
Sync all meetings from the connected Zoom account. Use with caution on large accounts as this may pull in irrelevant meeting data.
Advanced Zoom Options
Expand the Advanced Options section to fine-tune meeting selection:
- Meeting Duration — Filter by min/max duration (presets: Quick syncs 5–30 min, Regular 15–60 min, Extended 30–120 min)
- Participants — Set minimum participant count and optionally require at least one team member
- Time Filters — Exclude weekend meetings and/or after-hours meetings (configurable working hours)
- Recording Requirements — Only sync meetings with cloud recordings or transcripts (requires Zoom Pro or higher)
- Recurring Meetings — Include or exclude recurring meetings, with optional deduplication
Confluence: Space & Page Selection
Select Confluence spaces to monitor for documentation activity. Optionally filter by page type:
- All pages (default)
- RFCs (Request for Comments)
- ADRs (Architecture Decision Records)
- Runbooks
- Meeting Notes
Timezone & Teams
The Timezone & Teams tab is where you configure your project's team structure. Each team has its own timezone, working hours, EOD sync time, and member roster. This configuration powers ASYNC's handoff intelligence, standup generation, and timezone-aware reporting.
Creating a Team
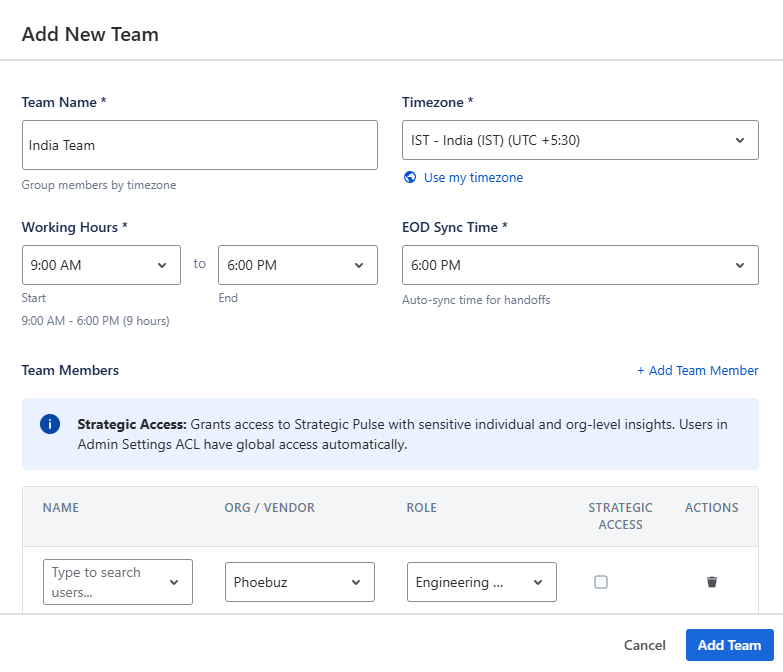
Click Add Team (or Add Your First Team if no teams exist) to open the team creation modal.
-
Name your team
Enter a descriptive team name (1–100 characters). Examples: "Frontend", "Platform — IST", "QA Seattle".
-
Set the timezone
Select from 500+ timezones or click Use my timezone to auto-detect. The timezone determines when working hours and the EOD sync are evaluated. A DST indicator shows if the selected timezone observes daylight saving time.
-
Configure working hours
Set the start and end times using the time selectors (30-minute intervals, displayed in 12-hour format). A preview shows the total working hours — for example: "9:00 AM – 6:00 PM (9 hours)". Default: 09:00 – 18:00.
-
Set the EOD sync time
Choose when ASYNC runs the end-of-day sync for this team. This is when handoff context is generated and intelligence is refreshed. Default: 18:00 (6:00 PM).
-
Add team members
Click + Add Team Member to add rows. For each member, configure:
- Name — Search for Jira users by typing at least 2 characters (typeahead with 300ms debounce). Duplicate members are prevented automatically.
- Org / Vendor — Select from the vendors defined in Admin Settings, or leave as "Internal" for in-house staff.
- Role — Select from the roles defined in Admin Settings (e.g., Developer, QA Engineer, Tech Lead).
- Strategic Access — Check this box to grant the member access to Strategic Pulse data. Users already in the Admin Settings ACL have global access automatically.
-
Click Add Team
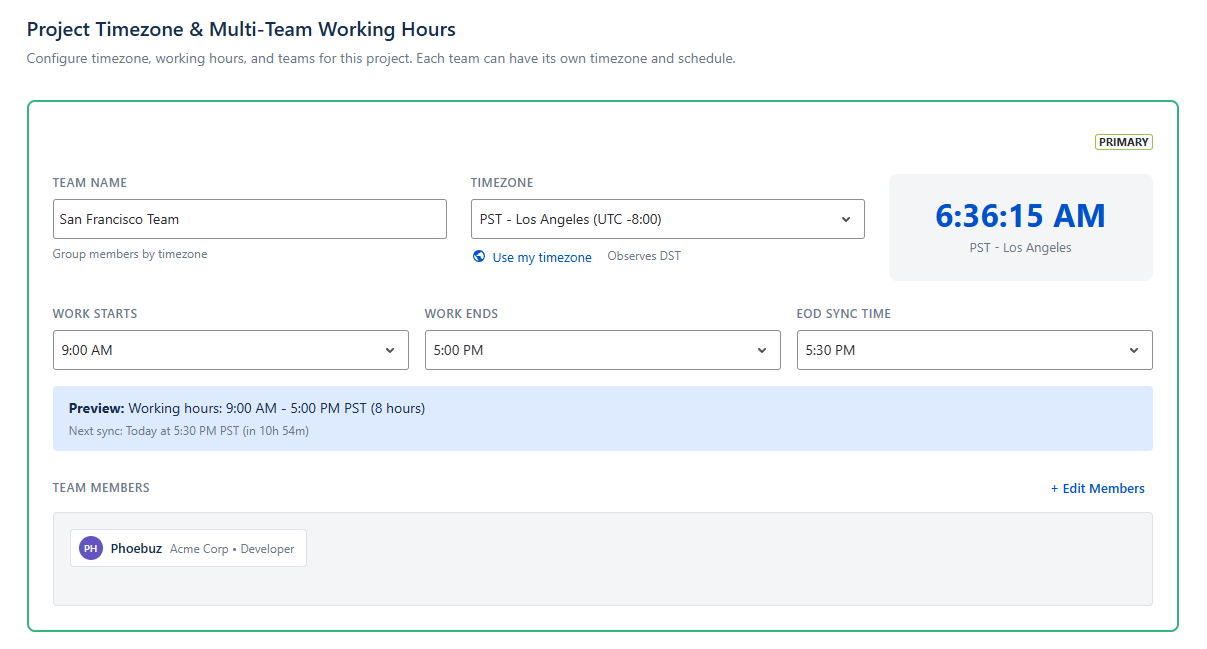
The team card appears with a live clock showing the current time in the team's timezone. Save your changes at the page level to persist.
Editing a Team
Each team card is directly editable. You can change the team name, timezone, and working hours inline. To manage members, click Edit Members on the team card to open the member editing modal.
Each team card displays:
- Live clock — Current time in the team's timezone, updating every second
- Timezone abbreviation — e.g., "IST", "PST", "CET"
- Working hours preview — e.g., "Working hours: 9:00 AM – 6:00 PM IST (9 hours)"
- Next sync — e.g., "Next sync: Today at 6:00 PM IST (in 3h 42m)"
- Member badges — Circular avatars with name, vendor, and role on hover
- Primary badge — Green lozenge on the primary team
Deleting a Team
Click Delete on a team card (not available for the primary team). A confirmation dialog appears: "Are you sure you want to delete {team name}? This action cannot be undone." Confirm to remove the team and all its member assignments.
Handoff Flow Preview
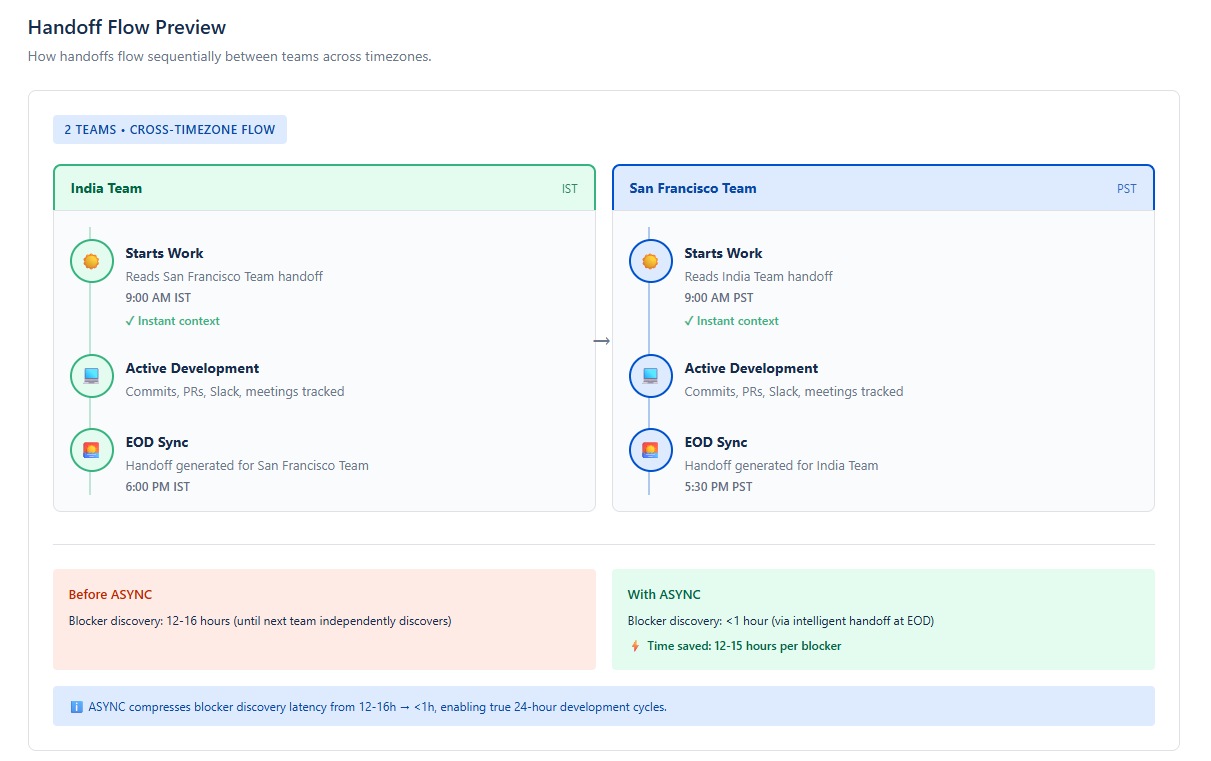
When you have one or more teams configured, a Handoff Flow Preview appears below the team cards. This visual timeline shows how ASYNC generates asynchronous handoffs:
Single Team Flow
Shows the daily async cycle within one team:
- Team member ends their day and completes work on issues and PRs
- ASYNC AI generates context by analyzing commits, PRs, Slack threads, and meetings
- An intelligent briefing is ready — blockers identified, decisions summarized, action items extracted
- The next team member starts their day and reads the AI briefing — instant context with zero ramp-up
- AI standup is generated with personalized notes for team sync
- The cycle repeats continuously
Impact: Saves 30+ minutes per person per day that would otherwise be spent catching up on Slack, emails, and meeting notes.
Multi-Team Cross-Timezone Flow
Shows how handoffs flow sequentially between teams across timezones. For example, a team in IST hands off to a team in CET, which hands off to a team in PST — creating a continuous 24-hour development cycle.
Each team's EOD sync generates a handoff briefing that the next timezone's team reads at their start of day.
Impact: Compresses blocker discovery latency from 12–16 hours to under 1 hour via intelligent handoffs at EOD.
Best practice: Group team members by timezone rather than functional role. A "Frontend IST" and "Frontend PST" split gives better handoff intelligence than a single "Frontend" team spanning 12 hours. Set EOD sync time to match when most members actually finish work.
Sync Settings
The Sync Settings tab controls how frequently ASYNC pulls data from enabled integrations, how long data is retained, and provides a history of all sync executions.
How sync works: ASYNC triggers individual syncs for each team member at their configured EOD time (or the scheduled interval). Each sync fetches data from all enabled integrations, correlates cross-tool signals, and generates personalized metrics and intelligence.
Sync Frequency
Choose how often ASYNC syncs data from your enabled integrations. Each mode is presented as a selectable card:
| Mode | Frequency | Best For | Notes |
|---|---|---|---|
| End of Day | At each team's EOD time | Distributed teams, async handoffs | Recommended. Default mode. |
| Every 15 Minutes | Every 15 min | Critical releases, active sprints | Highest data freshness. Higher storage consumption. |
| Hourly | Every hour | Steady-state development | Balanced frequency and storage usage. |
| Manual Only | On demand | Low-activity or paused projects | Not recommended for active development. |

Data Retention
Data retention determines how long synced data is kept before being automatically deleted. The retention period is determined by your pricing tier:
| Tier | Retention | Upgrade Path |
|---|---|---|
| Free | 14 days | Upgrade to Standard for 30 days |
| Standard | 30 days | Upgrade to Premium for 90 days |
| Premium | 90 days | — |
Incremental Sync
By default, incremental sync is enabled. This means ASYNC only fetches new or updated data since the last sync, which is faster and uses less storage.
Disable incremental sync only if you need a full data re-fetch (e.g., after correcting integration configuration). The toggle is available alongside the data retention display.
Recommendation: Keep incremental sync enabled for production use. It reduces sync time, lowers storage consumption, and avoids unnecessary API calls to integrated providers.
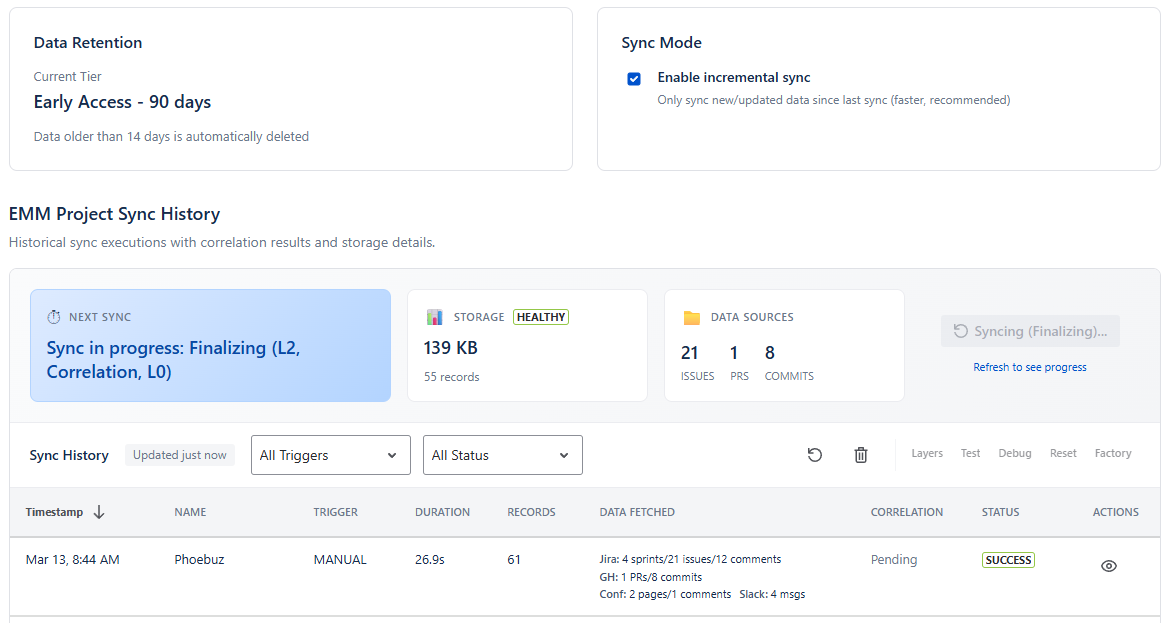
Sync History
The bottom section of the Sync Settings tab shows a detailed history table of all sync executions for this project.
Sync History Table Columns
- Timestamp — When the sync executed (sortable)
- Trigger Type — Manual, Scheduled, Auto-EOD, etc.
- Duration — How long the sync took
- Records Fetched — Number of data records retrieved
- Correlation Status — Cross-tool correlation results
- Actions — View details or delete a sync record
Manual Sync (Sync Now)
Above the history table, a Sync Now button triggers an immediate sync. During active syncs, a progress banner shows real-time status:
- Overall progress bar with percentage
- Chunk completion count (e.g., "3/5 chunks")
- Per-provider status (GitHub: 2/3, Slack: 1/1, etc.)
- Elapsed time display
- Final status: "Sync Complete", "Sync Completed with Errors", or "Sync Failed"
Next Sync Schedule
Above the history table, ASYNC displays when the next scheduled sync will run, based on your configured frequency and team EOD times. For multi-team projects, each team's next sync time is shown separately.
Tier Limits Reference
ASYNC enforces tier-based limits on integrations, teams, data retention, and shared users. Limits are displayed contextually throughout the UI with upgrade prompts when you reach a limit.
| Feature | Free | Standard | Premium |
|---|---|---|---|
| Integrations per project | 2 max | Unlimited | Unlimited |
| Teams per project | 2 max | 5 max | Unlimited |
| Data retention | 14 days | 30 days | 90 days |
| Common users | 5 | 20 | Unlimited |
| Price | Free (up to 10 users) | From $2.50/user/mo | Contact sales |
Hitting a limit? When you reach a tier limit (e.g., 2 of 2 integrations on Free), the UI disables the add/enable control and shows an upgrade prompt with the next tier's capacity. All billing is managed through the Atlassian Marketplace.