Getting Started
Up and running in minutes
ASYNC installs directly into your Jira Cloud instance via Atlassian Forge. No servers to provision, no infrastructure to manage. Follow the guided setup to go from install to your first engineering intelligence dashboard.
Overview
ASYNC is an Engineering Intelligence Platform that correlates data across your project management, source control, messaging, meetings, and documentation tools to surface actionable insights for engineering teams. It's built on Atlassian Forge, so all data stays within Atlassian's cloud infrastructure.
The setup process follows three sequential gates. ASYNC guides you through each one automatically. When you open the dashboard for the first time, it detects which gate you're at and shows the appropriate next steps.
Marketplace
Organization config
Teams & integrations
Data flows in
Intelligence ready
Requirements
Before installing ASYNC, verify your environment meets these requirements:
| Requirement | Details |
|---|---|
| Jira Cloud | Standard, Premium, or Enterprise plan. Jira Server and Data Center are not supported as ASYNC is built on Atlassian Forge, a cloud-native platform. |
| Site admin access | Required for initial installation and admin-level configuration. Project-level setup can be delegated to project administrators. |
| Atlassian Rovo (optional) | Required for AI Standup, Retrospective, and Copilot features. Included with Jira Premium and Enterprise. ASYNC works without Rovo, but these features will be unavailable. |
| LLM API key (optional) | Required if using Anthropic Claude, OpenAI, or Google Gemini for AI-Powered Insights. The built-in Forge LLM requires no API key. Without any LLM, ASYNC uses heuristic (rule-based) analysis. |
| Integration accounts (optional) | Source control (e.g., GitHub), messaging (e.g., Slack), meetings (e.g., Zoom), or documentation (e.g., Confluence) accounts. Each adds additional intelligence signal depth. Only Jira is required. |
Minimum viable setup: ASYNC delivers value with Jira alone. You can connect source control, messaging, meetings, and documentation tools at any time to unlock richer cross-tool intelligence.
Install from Atlassian Marketplace
-
Find ASYNC on the Marketplace
Visit the ASYNC listing on the Atlassian Marketplace, or search for "ASYNC" in your Jira instance under
Jira Settings→Find new apps. -
Install to your site
Click Get it free (for teams up to 10 users) or select your plan. Confirm the installation when prompted. The app is installed instantly via Atlassian Forge with no servers, no infrastructure, and no waiting.
-
Confirm the installation
After installation, ASYNC appears in three locations within Jira:
- Top navigation - The ASYNC dashboard (global page, accessible to all users)
- Jira Settings → Apps → ASYNC - Administration console (site admins only)
- Project Settings → Apps → ASYNC - Per-project configuration (project admins)
Gate 1: Admin Setup
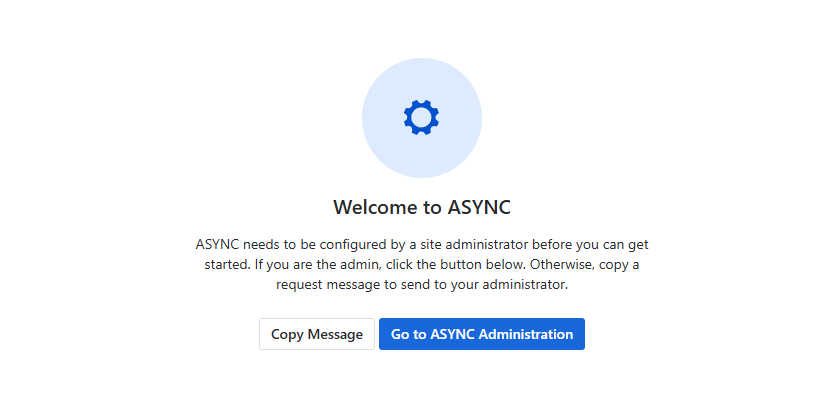
Site AdminThe first time any user opens the ASYNC dashboard, they'll see a "Welcome to ASYNC" screen if administration hasn't been configured yet. This is Gate 1, where ASYNC needs a site administrator to complete the initial organization-level setup.
What users see
When Gate 1 is active, the dashboard displays:
- A settings icon in a blue circle indicating setup is needed
- A "Go to ASYNC Administration" button that navigates directly to the admin console
- A "Copy Message" button that copies a pre-written request message to the clipboard, so non-admin users can ask their administrator to complete the setup
Non-admin users: If you're not a site administrator, use the Copy Message button to send a request to your admin. The copied message includes instructions for where to go and what to configure.
Complete the admin configuration
Click "Go to ASYNC Administration" to open the admin console (Jira Settings → Apps → ASYNC). The minimum configuration to pass Gate 1 is:
-
Set your organization name
ASYNC auto-populates this from your Jira site. Review it and adjust if needed. This name appears in handoff notifications and reports.
-
Configure ASYNC availability
Choose whether ASYNC is available to All projects or Specific projects (recommended). If you select specific projects, add at least one project to the list.
-
Connect integrations (optional but recommended)
Switch to the Integrations tab and connect your source control, messaging, meetings, and documentation tools via OAuth. Each integration adds additional signal depth to ASYNC's intelligence. See the Administration Guide: OAuth Integrations for detailed steps.
-
Configure AI (optional)
In the AI Configuration section, enable Atlassian Rovo (if available on your plan) and optionally configure an LLM provider for AI-Powered Insights. See the Administration Guide: AI Configuration for provider options.
-
Save changes
Click Save changes at the top of the Settings tab to persist all configuration. Gate 1 is now complete.
Gate 2: Project Setup
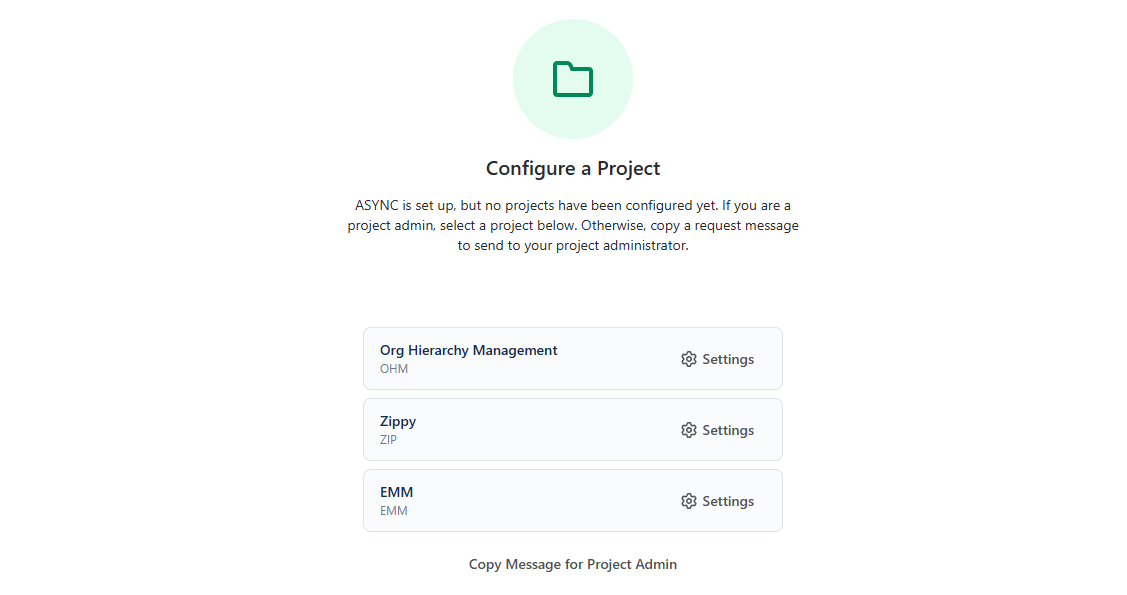
Project AdminAfter admin setup is complete, users see a "Configure a Project" screen if no projects have been configured with ASYNC yet. This is Gate 2, where at least one project needs team and integration settings before data can flow.
What users see
When Gate 2 is active, the dashboard displays:
- A folder icon in a green circle indicating project setup is needed
- A list of up to 3 projects the current user is assigned to, each with a Settings button that navigates directly to that project's ASYNC configuration
- A "Copy Message for Project Admin" button for users who aren't project administrators
- If the user has more than 3 projects, a note directs them to contact their project administrators for the remaining ones
Configure the project
Click Settings next to a project to open its ASYNC configuration (Project Settings → Apps → ASYNC Settings). The minimum configuration to pass Gate 2 is:
-
Enable integrations for this project
In the Integrations tab, toggle on the integrations you want to use for this project. Only integrations that have been connected at the organization level (in Admin Settings) are available here.
For each enabled integration, select the specific resources to monitor:
- Source control: Select repositories
- Team messaging: Select channels
- Meetings: Configure meeting filters
- Documentation: Select spaces
-
Set up teams with timezones
Switch to the Timezone & Teams tab and create at least one team. For each team, configure:
- Team name - e.g., "Frontend", "Platform", "Mobile"
- Timezone - Select from the dropdown or click "Use my timezone"
- Working hours - Start and end times (default: 09:00 to 18:00)
- EOD sync time - When the daily handoff sync runs (default: 18:00)
- Team members - Search and add Jira users, assign roles and optional vendor
See Project Settings for the full guide on team configuration.
-
Review sync settings
The Sync Settings tab controls how often ASYNC pulls data. The default EOD (End of Day) mode syncs at each team's configured EOD time. Other options include every 15 minutes, hourly, or manual-only. Data retention is tier-dependent (14 days on Free, up to 90 days on Premium).
-
Save changes
Click Save changes to persist the project configuration. Gate 2 is now complete for this project.
ASYNC not available? If a project shows "ASYNC not available for this project", the site administrator has not included it in the ASYNC availability list. Go to Admin Settings → ASYNC Availability to add the project, or use the Copy Message button to request it from your administrator.
Gate 3: First Sync
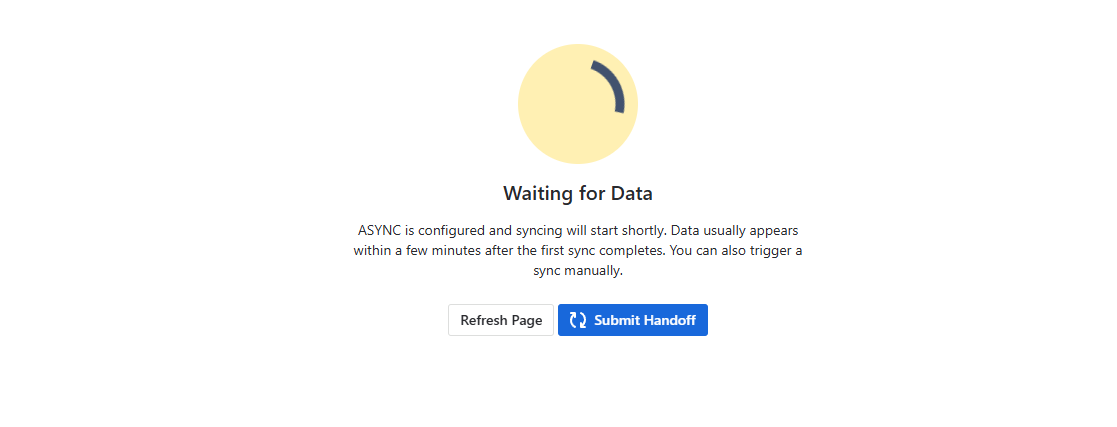
All UsersOnce both admin and project setup are complete, the dashboard shows a "Waiting for Data" screen. ASYNC is configured and the first sync needs to run before intelligence can be displayed.
What users see
When Gate 3 is active, the dashboard displays:
- A spinner icon in a yellow circle indicating sync is in progress or pending
- A message explaining that data usually appears within a few minutes
- A "Submit Handoff" button to trigger an immediate manual sync across all configured projects
- A "Refresh Page" button to check if data has arrived
Triggering the first sync
-
Click Submit Handoff
This triggers an immediate sync for all your configured projects. ASYNC queues each project sequentially, pulling data from Jira and all connected integrations (source control, messaging, meetings, documentation).
-
Wait for sync to complete
The first sync typically takes 1 to 3 minutes depending on your project size and number of integrations. A loading indicator shows while the sync is running.
-
Refresh the page
Click Refresh Page once the sync completes. The dashboard will transition from the waiting state to the full Engineering Pulse view with your sprint context, metrics, and intelligence cards.
Alternatively: You can skip the manual sync and simply wait. If your sync mode is set to EOD, the sync will run automatically at your team's configured end-of-day time. For 15-minute or hourly modes, data will appear after the next scheduled interval.
What's Next
Once the first sync completes, your ASYNC dashboard is live. Here's where to go from here:
Deep dive into AI configuration, roles, vendors, integrations, and storage management.
Configure integrations, teams, timezones, sync frequency, and data retention per project.
Understand sprint context, intelligence cards, AI standup, copilot, and filters.
Common questions, pricing details, data privacy, and troubleshooting common issues.
Pricing reminder: Teams of up to 10 users get free access. Teams with 11+ users pay per-user pricing starting at $2.50/user/month, with volume discounts up to 85% for larger organisations. All billing is handled through the Atlassian Marketplace.